How to Lock Cells in Excel? Prevent your cells from editing
Do you want to lock certain cell(s) in your worksheet? In this article, we will go through how to lock cells in Excel? If you’re working with a group of people on the same workbook or you do not want to corrupt your formulas by mistake, locking cells is a super useful feature.
Table Of Content
1. How to Lock Cells in Excel?
2. How Do I Lock Specific Cells in Excel?
3. What’s the Difference Between Locked and Hidden?
4. How to Lock Formula Cells?
5. How to Protect a Worksheet in Excel?
6. Extra Bonus: What Do the Protection Menu Elements Mean?
7. Conclusion
So, when sharing your meticulously crafted spreadsheets, you may want to protect certain cells to prevent accidental changes. 
1. How to Lock Cells in Excel?
To protect your sheets from accidental changes, you have two main tasks:
- Unlock the cell(s) you want to keep safe
- Protect the worksheet of that cells
So, now let’s see how to complete this tasks with step-by-step guide.
Step 1- Select the Cells You Want to Lock:
Firstly, we will click and drag to select the cells you want to lock.
For example, we have a sales table for our salesman, and we want to lock the commission rates cells. Firstly, we’ll select this range.
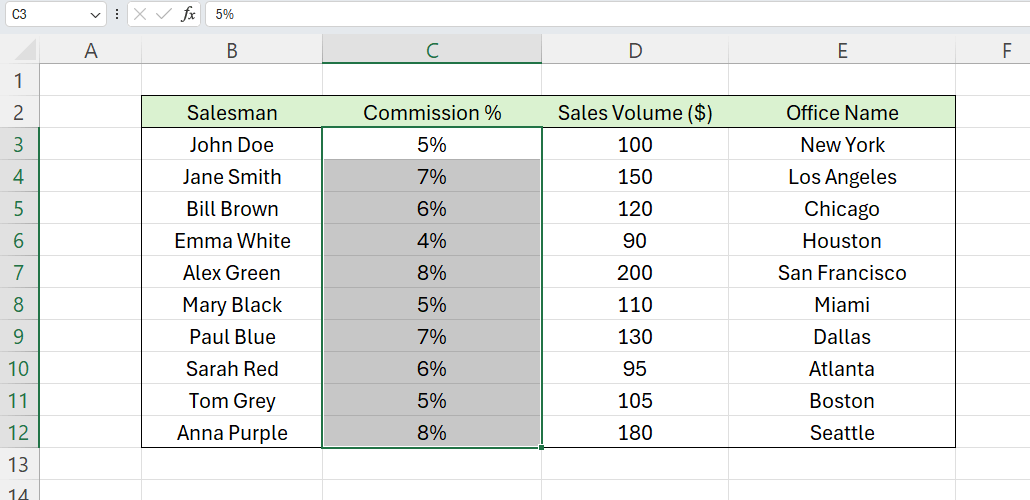
As a note, you can also hold down the Ctrl key to select multiple non-adjacent cells.
Step 2 – Open the Format Cells Dialog Box:
Secondly, we’ll open the Format Cells window. To lock your cells on your Excel worksheet, you can either:
- Use CTRL+1 shortcut key
- Or, Go to Home > Cells > Format > Format Cells
- Or, just Right-click on the selected cells and choose Format Cells from the context menu.

Now, we have our Format Cell window.
Step 3 – Enable the Lock Option:
In the Format Cells dialog box, go to the Protection tab and check the Locked checkbox.

So, this will lock your selected cells. But, you can still modify the cells, don’t you? What’s missing then? Here’s the trick, unlocking your cells is not enough, you should also protect the worksheet.
*WARNING: By default, all cells have the Locked option enabled, but this setting only takes effect once you protect the worksheet!
Step 4 – Protect the Worksheet:
So, now we’ll protect our worksheet to put your locked cells into effect.
To protect your sheet, you should go to Preview > Protect Sheet and if you want you can also input a password.

That’s all!
Now, no body can modify your locked cells.
2. How Do I Lock Specific Cells in Excel?
Locking specific cells in Excel involves unlocking your cells and then protecting your sheet:
- Select the Specific Cells
- Open Format Cell window with CTRL+1
- Checkmark the Locked box under the Protection tab and click OK
- On the main ribbon, go to Review > Protect Sheet and protect your worksheet with ou without password.
So, basically the process is pretty much the same.
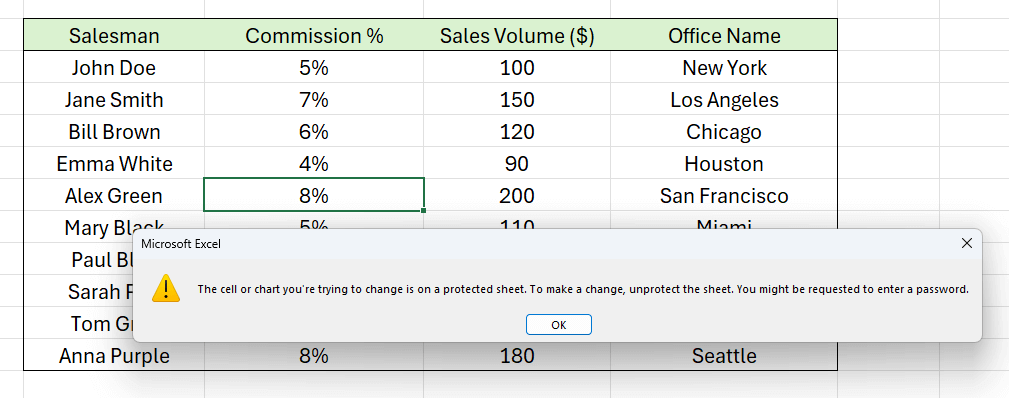
Also, after completing these steps, you can try to edit the locked cells to test if everything is al right. You should have received a warning now, telling that the cell you want to modify is under protection.
In summary, locking specific cells is particularly useful when you want to allow editing in some parts of the worksheet while protecting others, such as formulas or critical data.
3. What’s the Difference Between Locked and Hidden?
While locking your cells, you see two options under the Protection Tab:
- Locked
- Hidden
But what those concepts mean?
- Locked Cells: When you lock cells and protect the worksheet, users cannot edit the contents of these cells. Locking is ideal for preventing accidental or intentional changes to important data.
- Hidden Cells: Hiding cells specifically refers to hiding formulas. When you hide a cell and protect the worksheet, the formula within the cell is not visible in the formula bar. So, the users can still see the result of the formula. But they cannot view or edit the formula itself. This is useful for protecting proprietary calculations or sensitive formulas from being exposed.
In summary, locking cells prevents edits, while hiding cells keeps formulas confidential while still displaying their results.
4. How to Lock Formula Cells?
So, let’s suppose we only want to lock the formula cells in a worksheet.
Locking formula cells is a common requirement to ensure that complex calculations are not altered. The only trick here is finding the formula cells.
Let’s see our steps:
First step is to elect All Cells with Formulas:
Press Ctrl + G to open the Go To dialog box. Click on Special, then select Formulas and click OK.
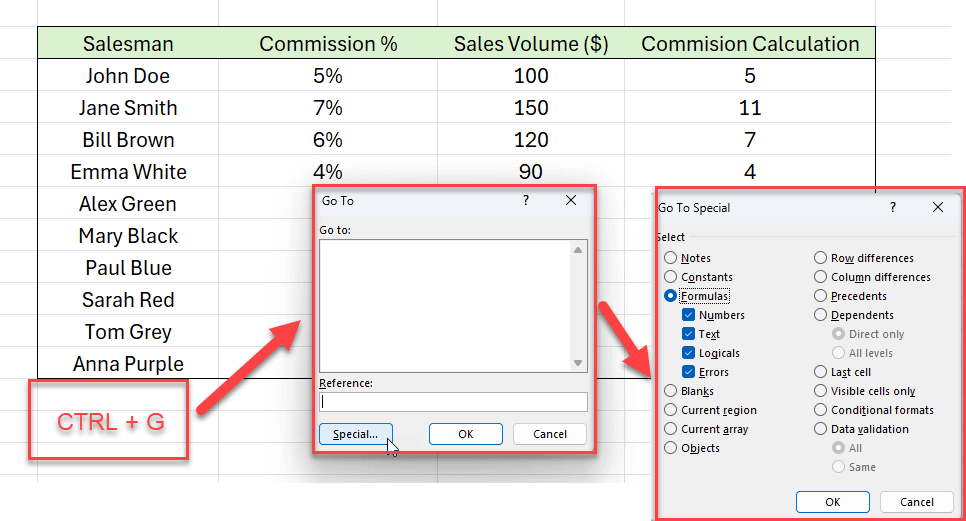
This highlights all cells containing formulas.
Then, repeat the below steps:
- Click CTR+1 to open Format Cell window
- Check Locked under the Protection tab
- Protect your worksheet from the Preview > Protect Worksheet menu
Locking formula cells ensures that your calculations remain intact and free from unauthorized modifications.
5. How to Protect a Worksheet in Excel?
As a last note, to lock your cells, you should also protect your Excel sheet. So, let’s also underline protecting a worksheet in Excel.
So, you can protect your worksheet or workbook in Excel. The first applies to the active sheet, while the second is related to the entire workbook.
To protect your worksheet, go to Preview > Protect Sheet and after selecting your protection settings, click on OK. Also, you can add a password if you want.
*ATTENTION: If you have some cells on your worksheet that the user should use, then don't forget to deactivate their lock before protecting your sheet.
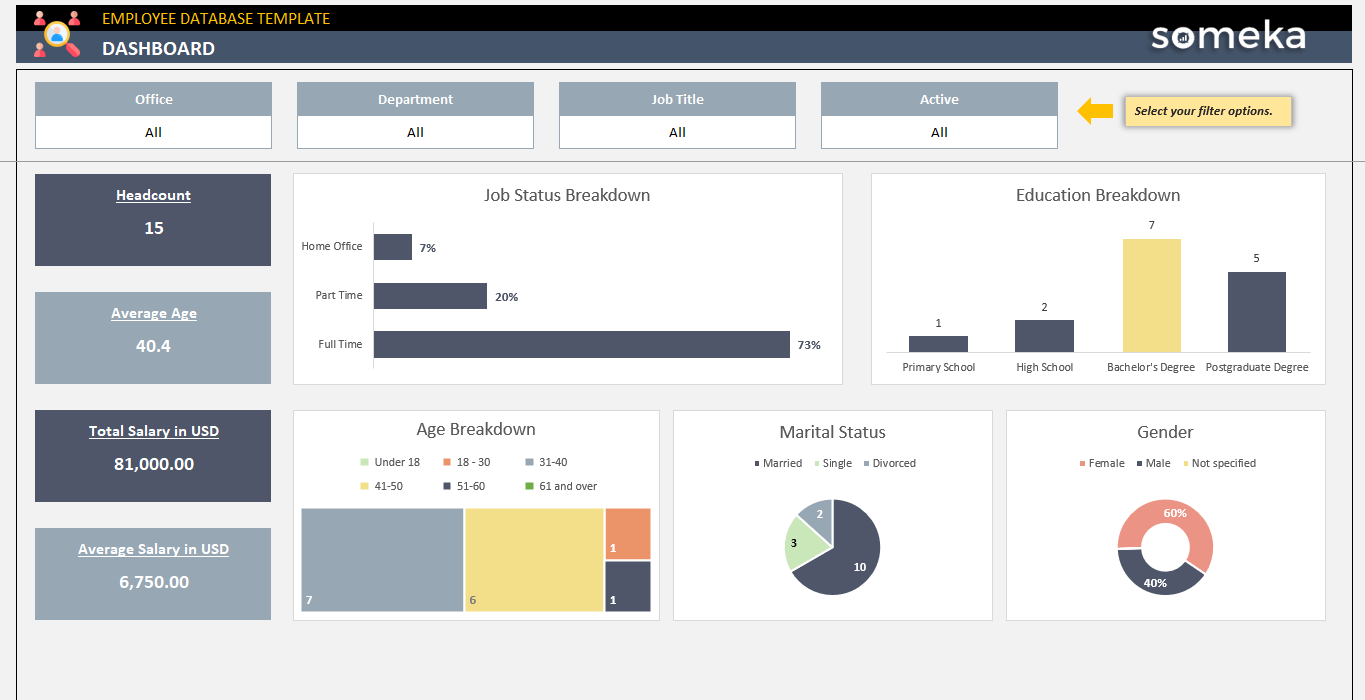
For example, on our Dashboards, we have filters above to create dynamic analysis. Although we protect the worksheet, we keep these filters unlocked. Otherwise, the user cannot change the filter value:
>> Download Employee Database Excel Template
So, the above image is from the Dashboard section of one of our HR templates. The Office, Department, Job Title and Active filters are all Unlocked, so that the user can play with the dynamic dashboard.
Finally, protecting a worksheet adds an additional layer of security to your entire spreadsheet.
6. Extra Bonus: What Do the Protection Menu Elements Mean?
Maybe you’re curious about all the options under your protection menu. Each of these elements let you to configure your permissions to lock cells in your Microsoft Excel spreadsheet.
Let’s underline some of these options:
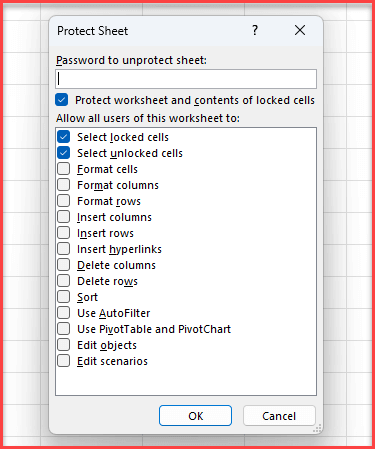
- The first two of these elements, Select Locked Cells and Select Unlocked Cells, come checked by default. These options allow users to navigate through all cells, both locked and unlocked.
- Format Cells option let the user enter a value for a different condition when applied a conditional formatting.
- Format rows and columns setting let the user change the width/height of your columns and rows, in addition to hiding option.
- Insert rows and columns let the user add new rows or columns to the worksheet.
- The other options are for permissions about deleting rows/columns, sorting, auto-filters, pivot tables and pivot charts.
- Lastly, the Edit Objects command let the user to make modifications on the objects like shapes, charts, text boxes, etc. On the other hand, the Edit Scenarios command let the user play with the existing scenarios or add new ones.

7. Conclusion
Finally, if you’re working on shared files or you want to protect your values or formulas from accidental mistakes, locking cells will be a life-saver for you.
And this guide tries to explain how to lock cells in Excel with explanations, examples and tips. This is a two-level task. Basically, you should first define the cells you want to unlock and then protect your sheet. So, this two-level task let you to exclude some of the cells from your protection.
Hope you enjoy our article. Happy Excel-ing!
Recommended Readings:
Recommended Readings:
How to fix #VALUE! Error in Excel? Reasons, Troubleshoot Tips & Solutions
Related Posts