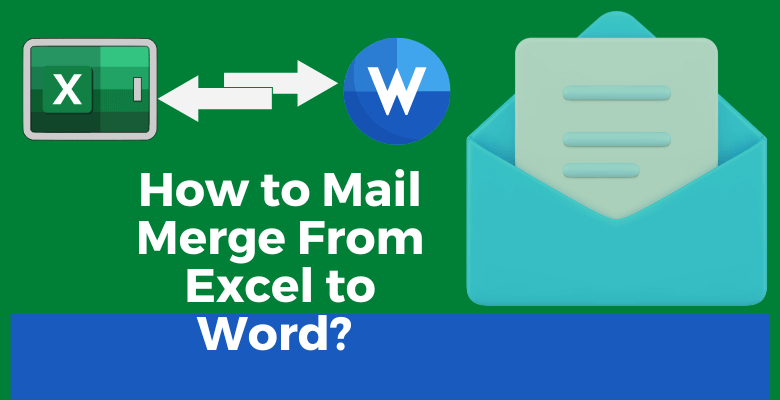
How to Mail Merge From Excel to Word? Step-by-Step Mass Mail Guide
Microsoft Word and Microsoft Excel, today’s active office tools, can interact and work together beyond our expectations. Mail merge is a powerful Microsoft Word feature that allows you to combine a mail draft created in Word with a recipient list from Excel. This process saves time and effort by simplifying the sending of personalized bulk emails.
In this blog post, we will show you the detailed answer to “How to mail merge from Excel to Word?” with two different methods to work things out and walk you through a step-by-step guide on how to perform an Excel-to-Word mail merge, allowing you to send customized emails efficiently.
Table of Contents
1. How to Mail Merge From Excel to Word?
2. Mail Merge & Email Sender Template
3. Conclusion
4. FAQs
1. How to Mail Merge From Excel to Word?
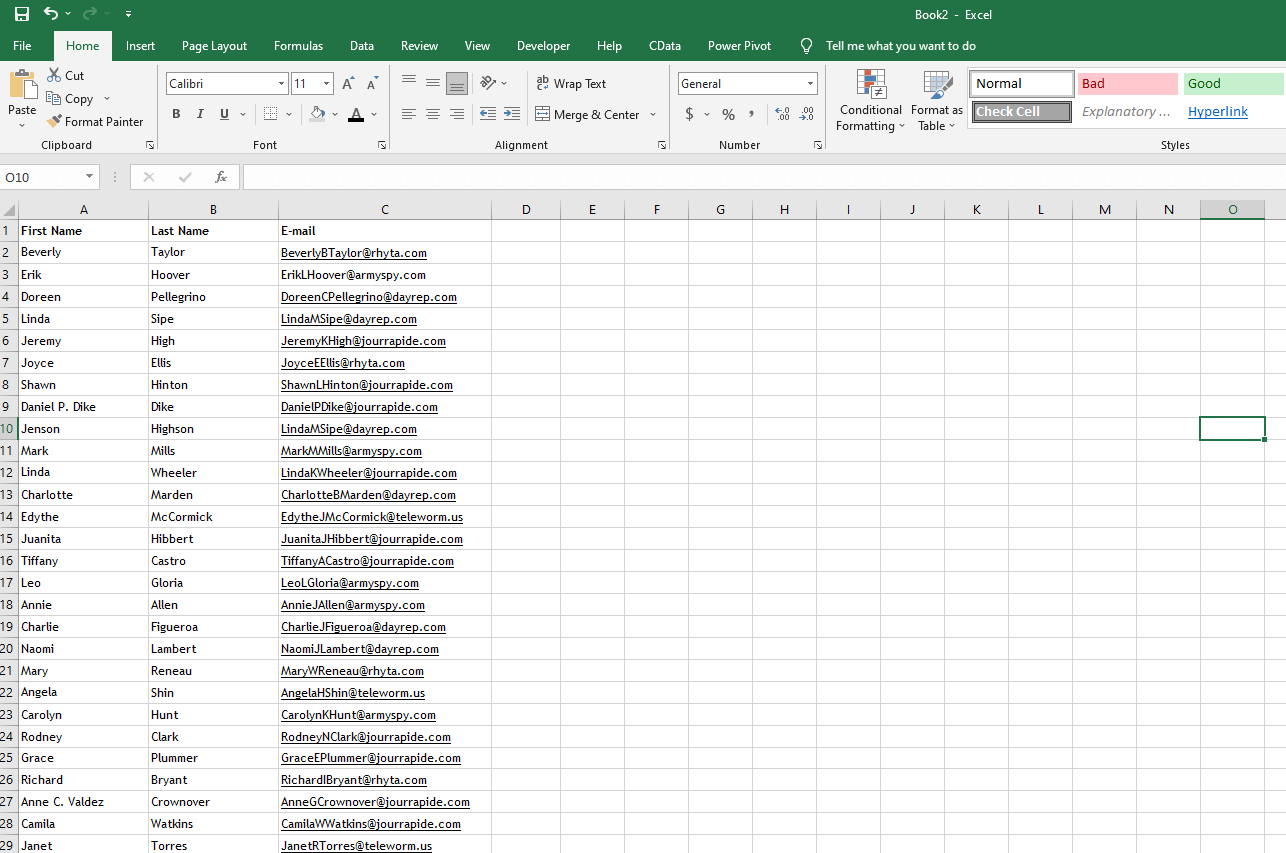
Step 1 – Prepare the Recipient List in Excel
To begin the mail merge process, you need a recipient list in Excel. Open Excel and create a spreadsheet with columns for recipients’ names, email addresses, and any other relevant information. Ensure that each column has a header describing its content. Enter the recipient information row by row, ensuring accuracy and consistency.
Step 2 – Prepare Your Mail Text in Word
Open Microsoft Word and create a new document or open an existing one. Compose the email draft or letter you want to send to your recipients. So, include placeholders or merge fields where you want personalized information, such as the recipient’s name or email address, to appear.
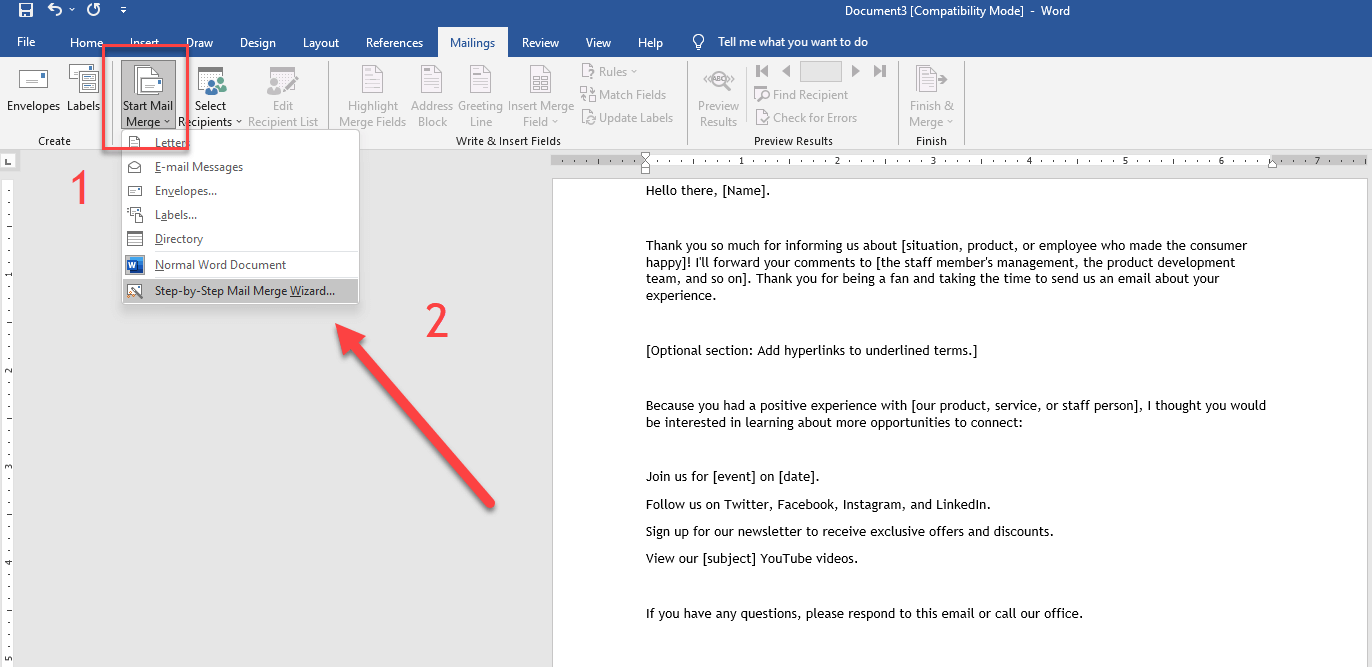
Step 3 – Start Mail Merge
If you are ready to start the mail merge, this step is about how to use mail merge. Let’s do a mail merge in Word to create a mail merge. Thus, navigate to the “Mailings” tab in the ribbon menu and click on the “Start Mail Merge” button. From the drop-down menu, select “Step-by-Step Mail Merge Wizard” to launch the mail merge wizard.
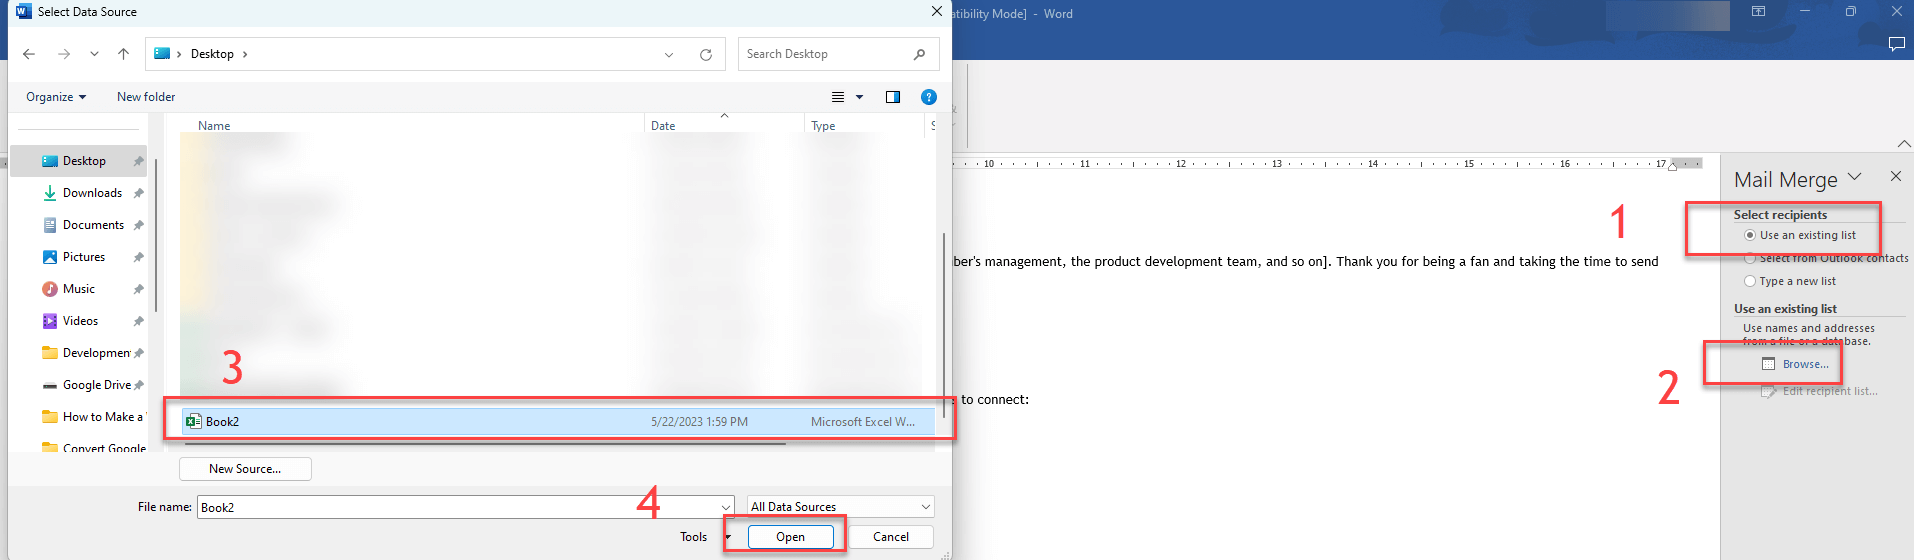
Step 4 – Select Recipients Using an Existing List How to Mail Merge from Excel to Word
In the mail merge wizard, choose the option “Use an Existing List” Click on the “Browse” button and locate the Excel spreadsheet containing your recipient list. Hence, to select the sheet and table that contains the recipient information and click “OK” to confirm.
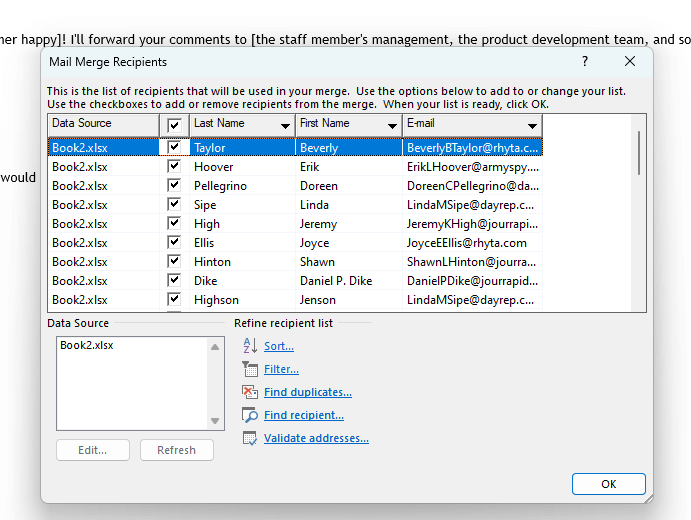
Step 5 – Editing the Recipient List
If needed, you can filter and sort the recipient list at this stage. The mail merge wizard allows you to exclude certain recipients or rearrange the order based on specific criteria. Make the necessary adjustments and proceed to the next step.

Step 6 – Adding the Placeholders
In this step, you will insert the placeholders or merge fields into your mail text to personalize each email. Place your cursor where you want the personalized information to appear, such as the recipient’s name. From the mail merge wizard, click on the “More Items” button and select the desired field from the recipient list. Then, repeat this process for each placeholder you wish to add.
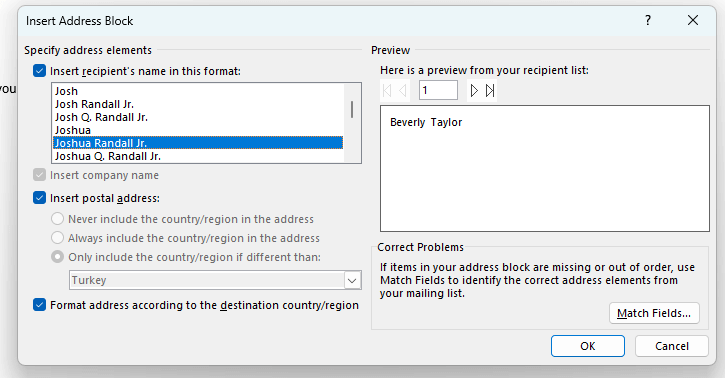
Step 7 – Adding the Address Block
To add an address block at the beginning of your email or letter, click on the “Address Block” button in the mail merge wizard. Thus, to customize the address block format according to your preferences and preview the results. Make any necessary adjustments before proceeding.
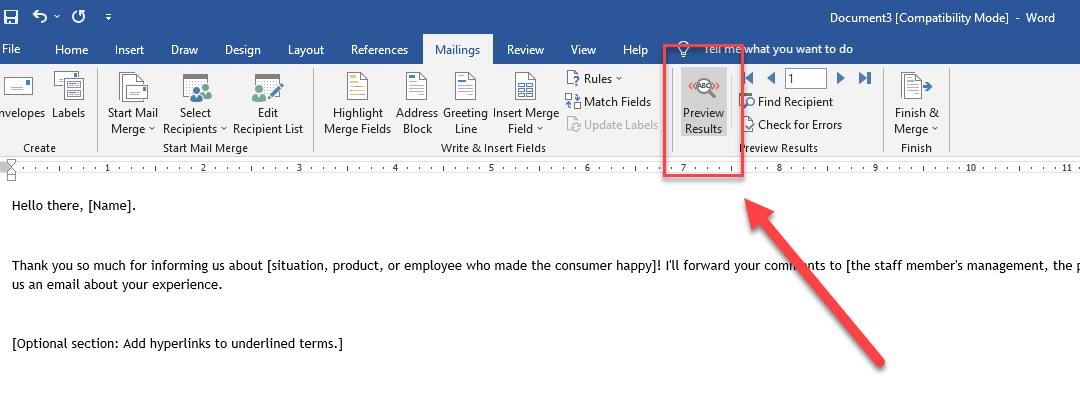
Step 8 – Preview
Before sending out your mass emails, it’s crucial to preview how each merged email will look. Use the mail merge wizard to navigate through the recipient list, reviewing the content and ensuring that the placeholders are correctly populated with personalized information. Make any final modifications if needed.
Step 9 – Sending the Emails
Once you are satisfied with the preview, you are ready to send your personalized emails. Click on the “Finish & Merge” button in the mail merge wizard and select the “Send Email Messages” option. Choose your email settings, such as the email subject, sender, and format. Finally, click “OK” to start the mail merge process. Microsoft Word will generate individual emails for each recipient, merge the content with the recipient list from Microsoft Excel, and send them according to your specifications.
2. Mail Merge & Email Sender Template
Are you tired of spending countless hours on manual-driven and time-consuming email sending processes? Do you find yourself in need of sending multiple emails simultaneously or frequently sending basic emails without the hassle of complex software? Look no further! We present to you the ultimate solution called as the Email Sender Template.
This ingenious mail merge spreadsheet solution, coupled with MS Excel and configured Outlook, enables you to effortlessly create and manage a large number of emails efficiently, or if you need to send email based on cell value.
When it comes to streamlining your email communication, utilizing the two sections of single emails and templates in the mail merge process can bring remarkable benefits. Let’s delve deeper into each section to explore their functionalities and advantages.
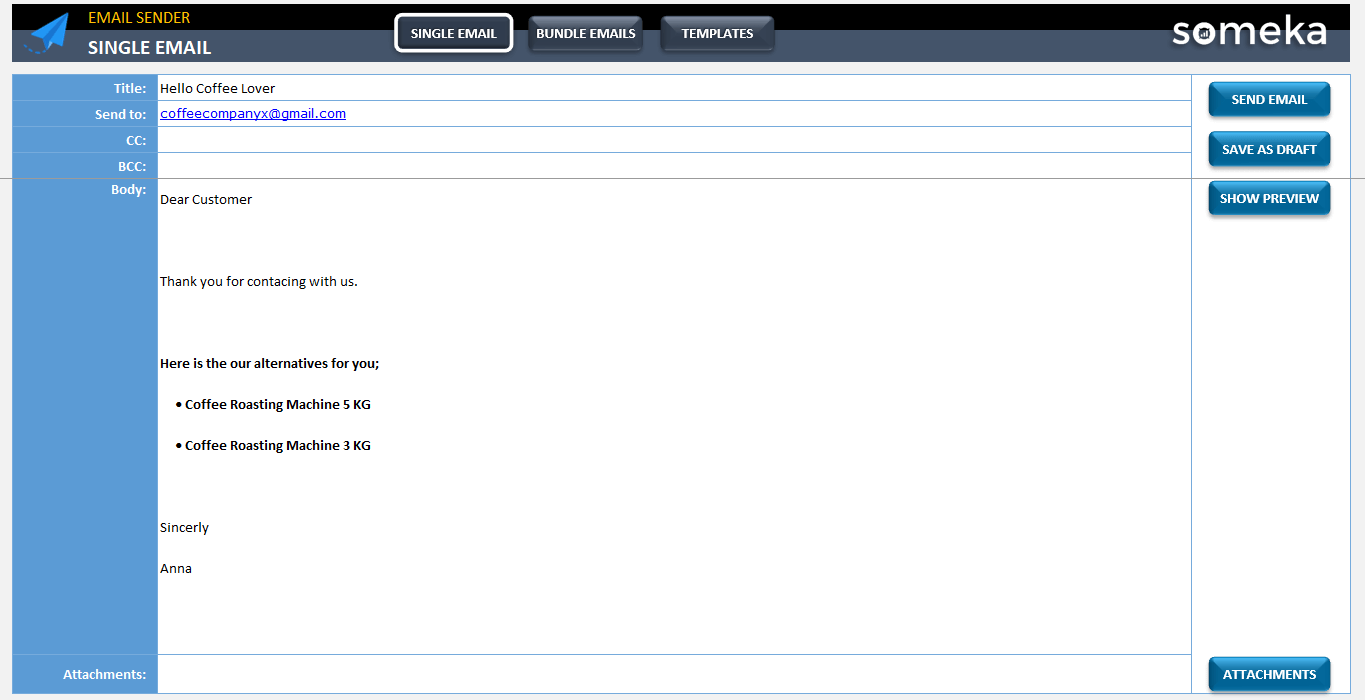
– This image is from the Single Mail Section of Mail Merge & Email Sender Excel Template by Someka-
You’ll also find email templates to help you:
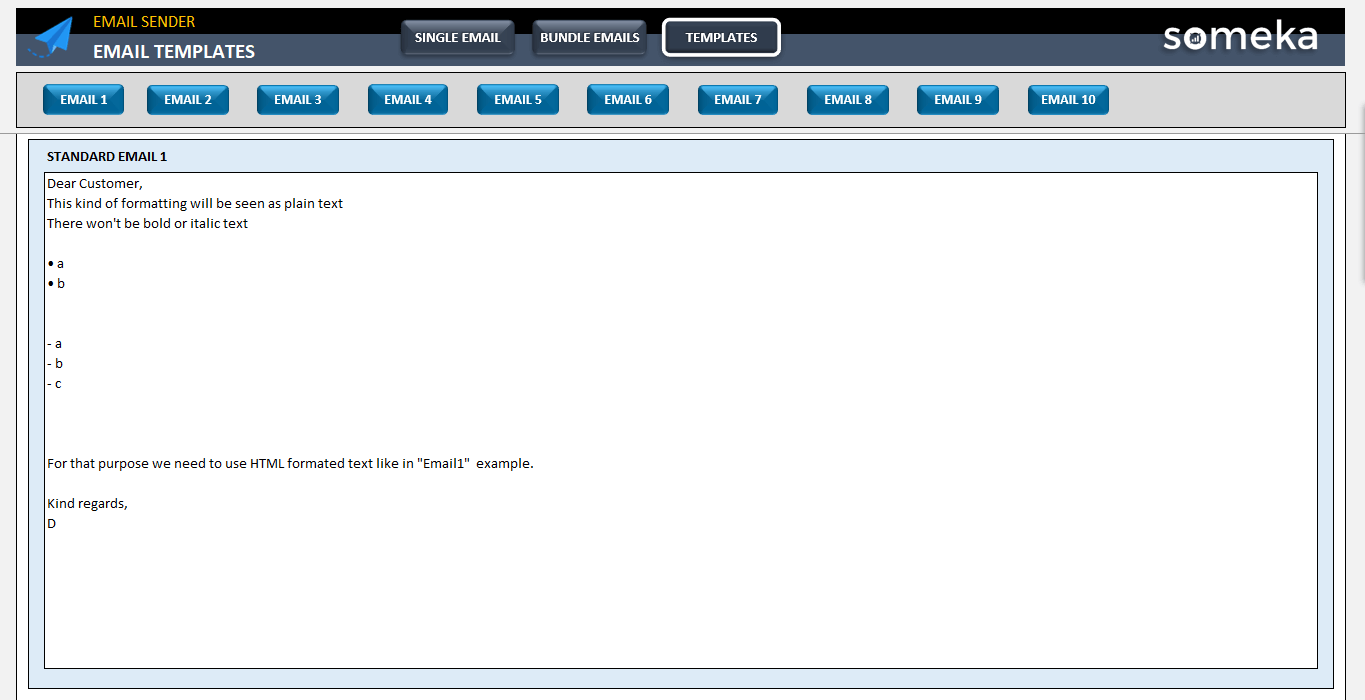
The Email Sender Template has ten template email samples for you
By utilizing these two sections, you can significantly enhance your email efficiency. The single email section ensures a clean and organized layout for repetitive emails, while the templates section saves time by enabling you to quickly access and utilize pre-prepared drafts.

– You can send bundle mails with Someka’s Email Sender Excel Template –
Therefore, say goodbye to the hassle of composing emails from scratch each time. With the mail merge template’s two sections, you can streamline your email communication process, maintain consistency, and boost productivity.
Take advantage of these features to optimize your email workflow and experience the benefits of efficient and effective email management. Then, start using the two sections of single emails and templates in your mail merge process today, and witness the transformation in your email efficiency and productivity.
3. Conclusion
Mastering the art of mail merging from Excel to Word or docs opens up a world of possibilities, enabling you to effortlessly send personalized mass emails. However, when combined with ready-to-use Excel templates, you can achieve breakthrough solutions that save you valuable time. In this blog post, we have provided a step-by-step guide to help you streamline your communication process, create professional looking emails, and effectively engage with your recipients. By harnessing the full potential of the mail merge feature in Microsoft Word and utilizing these Excel templates, you can unlock the true power of customized mass emails. In other words, that is exactly how to unleash the power of Mail Merge and Excel Templates for effortless email communication.
Accordingly, it’s important to note that our Email Sender Template is fully compatible with Excel 2010 and later versions. Regrettably, it is currently not available for Microsoft Excel on Mac. To get started with our template, you will need to have Outlook installed and properly set up. If you can access Outlook and manually compose an email, our template will take your efficiency to new heights.
Finally, the days of exhausting and repetitive email composing are over. With our Email Sender Template, you can streamline your email sending process, saving precious time and effort. Because, this dynamic tool harnesses the power of MS Excel, providing a user-friendly interface that simplifies email management and delivery.
4. FAQs on Mail Merge from Excel
1. How do I do a simple mail merge using the Wizard?
Performing a simple mail merge using the Wizard in Microsoft Word is a straightforward process. To get started, open a new document and navigate to the “Mailings” tab in the ribbon menu. From there, click on the “Start Mail Merge” button and select “Step-by-Step Mail Merge Wizard” from the drop-down menu. Then, the Mail Merge Wizard will open on the right side of the screen, guiding you through the process. Follow the prompts to select the document type, such as letters, emails, or envelopes, and choose your recipient list, which can be imported from Excel, Outlook, or another data source.
Consequently, customize your document by inserting merge fields that represent the data from your recipient list. So, preview the merged documents and make any necessary adjustments to ensure they appear as desired. Finally, complete the mail merge by selecting the option to print, email, or save the merged documents.
2. Is mail merge free?
Evidently, yes. Mail merge is a built-in feature in Microsoft Word, and it is available for free to users who have Word installed on their devices. You can access the mail merge functionality without any additional cost. Only the cost is higher than with ready to use Excel templates.
 3. Can you mail merge in Excel without Word?

Indeed, yes. You can perform a mail merge using Excel without Word, but the process is different. Excel has its own built-in functionality called “Excel Send Email” which allows you to send emails directly from Excel without using Word.
Thus, to utilize Excel Send Email, you can follow these steps. First, open Excel and ensure you have the recipient list and email content prepared. Next, select the range of email addresses in Excel. Proceed to the “File” tab and choose “Save As” Save the file as a “CSV (Comma delimited)” file type. Close Excel and open the saved CSV file using a text editor like Notepad or Editpad. Copy the email content into the text file’s body, ensuring each email starts on a new line. Save the text file with a .csv extension. Open Excel again and go to the “File” tab. Click on “Options” and select “Customize Ribbon” In the “Main Tabs” section, check the box next to “Developer” to enable the Developer tab.
Save the changes by clicking “OK” Now, navigate to the “Developer” tab and click on “Visual Basic” to open the VBA editor. Insert the necessary code in the VBA editor to send the emails using the Excel Send Email feature. You can refer to our “Excel Send Email” blog post or sample code and instructions. Finally, run the code to send the emails to the recipients listed in Excel.
Please note that using Excel Send Email requires some knowledge of VBA programming. Alternatively, for more complex mail merge scenarios, it is recommended to use Mail Merge & Email Sender Excel Template of Someka.
4. Is mail merge still used?
Yes, mail merge is still widely used in various industries and for different purposes. So, it remains a valuable tool for creating personalized mass communications, such as personalized emails, letters, envelopes, labels, and more. Mail merge is particularly useful when sending bulk communications that require customization for each recipient. Besides, it helps save time, ensures accuracy, and allows for efficient engagement with recipients. Whether for business correspondence, marketing campaigns, or any other mass communication needs, mail merge continues to be a relevant and widely utilized feature.
Recommended Readings:
Related Posts